

6 Easy Dutch Recipes at Home You Can Make Tonight
Table of Contents
My mother-in-law is Dutch, and the first time she watched me attempt poffertjes in her kitchen, she laughed so hard she had to sit down. My batter was too thick, my pan wasn’t hot enough, and I flipped them with a regular spatula instead of two forks, which is apparently a cardinal sin in Rotterdam. That disaster sent me down a two-year rabbit hole of testing easy Dutch recipes at home until I could make her proud. What I found surprised me: Dutch home cooking isn’t about fussy technique. It’s about a handful of humble ingredients — potatoes, cabbage, eggs, apples — treated with a little patience and a lot of butter.
This collection is the result of dozens of kitchen trials, several burnt batches, and one memorable evening where I set off my smoke alarm making bitterballen. Below are six easy Dutch recipes at home that I make on repeat, from a five-ingredient sandwich to a pea soup my Dutch father-in-law swears is better than his own mother’s.
Why These Dutch Recipes Work So Well at Home
I gravitated toward these six dishes because none of them demand special equipment or hard-to-find ingredients. You likely already have potatoes, onions, and eggs in your kitchen right now.
Dutch cooking also leans on one-pot and one-pan methods, which matters if you’re cooking on a weeknight. Every recipe here comes together with basic stovetop or oven skills — nothing that requires a thermometer-precise technique or a trip to a specialty grocer.
What Ties These Easy Dutch Recipes at Home Together
Each recipe below uses ingredients sold in any regular grocery store, and none require more than 45 minutes of active cooking time. I’ve grouped a quick-reference table so you can decide what to make first based on how much time you actually have tonight.
| Recipe | Type | Active Time | Total Time |
|---|---|---|---|
| Poffertjes | Sweet breakfast | 20 min | 35 min |
| Erwtensoep | Soup | 20 min | 1 hr 45 min |
| Hutspot | Side dish | 15 min | 35 min |
| Uitsmijter | Lunch/sandwich | 10 min | 15 min |
| Appeltaart | Dessert | 30 min | 1 hr 30 min |
| Bitterballen | Snack | 30 min | 1 hr (plus chilling) |
Recipe 1: Poffertjes (Mini Dutch Pancakes)

Poffertjes are small, fluffy, yeasted pancakes traditionally cooked in a special cast-iron pan with dozens of shallow indentations. The first time I made these, I used a regular skillet, and they spread into one giant sad pancake. A well or a standard nonstick pan with a bit of patience works fine if you don’t own the specialty pan — you’ll just make them a bit bigger and call them “mini pannenkoeken” instead.
Ingredients
| Ingredient | Amount | Why It’s There / Substitute |
|---|---|---|
| All-purpose flour | 1 cup | Structure; can sub half buckwheat flour for a nuttier, more traditional flavor |
| Instant yeast | 1 tsp | Gives poffertjes their signature light, airy texture |
| Warm milk | 1 cup | Activates yeast; sub oat milk for dairy-free |
| Egg | 1 large | Binds batter and adds richness |
| Sugar | 1 tbsp | Feeds the yeast, adds subtle sweetness |
| Salt | 1/4 tsp | Balances sweetness |
| Melted butter | 2 tbsp, divided | 1 tbsp in batter, 1 tbsp for cooking |
| Powdered sugar | For dusting | Traditional finishing touch |
Instructions
Make the Batter
- Whisk warm milk (about 105°F, just warm to the touch) with sugar and yeast. Let it sit 5 minutes until foamy — if it doesn’t foam, your yeast is dead and you need fresh yeast.
- Whisk in flour, salt, egg, and 1 tablespoon melted butter until you get a smooth, thick batter, similar to pancake batter.
- Cover and let rest in a warm spot for 30 minutes. It should look slightly puffy and bubbly on top.
Cook the Poffertjes
- Heat a nonstick skillet or poffertjes pan over medium heat and brush with the remaining melted butter.
- Spoon 1-2 tablespoons of batter per poffertje into the pan, leaving space between each.
- Cook 90 seconds until bubbles form on top and the edges look set, then flip with two forks and cook another 60-90 seconds.
- Transfer to a plate, dust generously with powdered sugar, and add a small pat of butter on top while still warm.
Pro tip: letting the batter rest matters more than people expect — as the flour hydrates during resting, the gluten relaxes, which is exactly why the batter puffs into something tender instead of chewy, according to food science coverage from The Kitchn on why batters need to rest before cooking.
Recipe 2: Erwtensoep (Dutch Split Pea Soup)
Erwtensoep is the dish that made me understand Dutch winter comfort food. It’s thick enough that a spoon can stand up in it — Dutch cooks joke that if it doesn’t, you haven’t made it right. My first attempt was too watery because I rushed the simmer time; the peas need a full hour to break down properly.
Ingredients
| Ingredient | Amount | Why It’s There / Substitute |
|---|---|---|
| Dried split peas (green) | 1 lb | The soup’s base; rinse first to remove debris |
| Smoked sausage (rookworst) | 12 oz | Traditional flavor; sub kielbasa if unavailable |
| Bacon or pork hock | 4 oz | Deepens the smoky, savory flavor |
| Onion, diced | 1 large | Aromatic base |
| Leeks, sliced | 2 | Classic Dutch soup vegetable; sub extra onion |
| Celery root or celery stalks | 1 cup, diced | Earthy background flavor |
| Carrots, diced | 2 | Sweetness and body |
| Potato, diced | 1 medium | Extra thickening |
| Water or stock | 8 cups | Cooking liquid |
| Bay leaf | 1 | Background aromatic |
| Salt and pepper | To taste | Seasoning |
Instructions
- Rinse split peas under cold water and pick out any debris.
- In a large pot, combine peas, bacon or pork hock, onion, water, and bay leaf. Bring to a boil, then reduce to a low simmer.
- Simmer uncovered for 60 minutes, stirring occasionally so the peas don’t stick to the bottom.
- Add leeks, celery root, carrots, and potato. Continue simmering 30-40 minutes until the peas have completely broken down and the soup is thick.
- Remove the pork hock, shred the meat, and stir it back into the pot. Slice the smoked sausage and add it in for the final 10 minutes to warm through.
- Season with salt and pepper. Let the soup sit off heat for 10 minutes before serving — it thickens further as it cools slightly.
Common mistake I made: adding the sausage too early. It turns rubbery after an hour of simmering, so it goes in only at the very end.
Split peas also happen to be a genuinely smart base for a weeknight soup nutritionally — USDA nutrient data shows a cup of cooked split peas delivers roughly 231 calories, with the majority of that coming from protein and complex carbohydrates rather than fat.
Recipe 3: Hutspot (Mashed Potatoes with Carrots and Onions)
Hutspot is what Dutch families eat with sausage or stewed beef on a cold night, and it’s the easiest recipe on this list. It’s essentially one pot, three vegetables, and a masher.
Ingredients
| Ingredient | Amount | Why It’s There / Substitute |
|---|---|---|
| Potatoes, peeled and cubed | 2 lbs | The mash base; Yukon Gold works best |
| Carrots, peeled and chopped | 1 lb | Adds sweetness and the dish’s orange color |
| Onions, chopped | 2 large | Adds savory depth once softened and mashed in |
| Butter | 4 tbsp | Richness; can sub olive oil |
| Whole milk | 1/2 cup, warmed | Loosens the mash to the right texture |
| Salt and pepper | To taste | Seasoning |
Instructions
- Place potatoes, carrots, and onions in a large pot and cover with cold, salted water.
- Bring to a boil, then reduce heat and simmer 20-25 minutes until everything is fork-tender.
- Drain thoroughly and return the vegetables to the warm pot.
- Mash with butter and warm milk until mostly smooth, with a few small chunks of carrot remaining for texture.
- Season generously with salt and pepper, then serve topped with a well of melted butter in the center.
Mistake to avoid: don’t skip warming the milk before adding it. Cold milk shocks the mash and can make it gluey instead of fluffy.
Recipe 4: Uitsmijter (Ham, Cheese and Fried Egg Sandwich)
If you only try one recipe from this list, make it this one. Uitsmijter is an open-faced sandwich of bread, ham, cheese, and fried eggs that Dutch households eat for a quick lunch, and it’s ready faster than most breakfast cereals.
Ingredients
| Ingredient | Amount | Why It’s There / Substitute |
|---|---|---|
| Bread slices | 2 | Base layer; sourdough or a hearty white bread both work |
| Butter | 1 tbsp | For toasting the bread and frying eggs |
| Sliced ham | 3-4 slices | Traditional protein; roast beef also works |
| Gouda cheese, sliced | 2-3 slices | Signature Dutch cheese; sub any semi-hard cheese |
| Eggs | 2-3 | Fried, yolks left runny |
| Salt and pepper | To taste | Seasoning |
| Fresh chives, chopped | 1 tbsp | Optional garnish for color and freshness |
Instructions
- Toast the bread slices and butter them while still warm.
- Layer ham and cheese on top of each slice of bread, arranging them on a plate.
- In a skillet, melt a little more butter and fry the eggs sunny-side up, keeping the yolks soft.
- Slide the fried eggs on top of the ham and cheese.
- Season with salt, pepper, and chives, then serve immediately while the yolk is still runny enough to soak into the bread.
Why this one works so well as a weeknight fallback: it uses ingredients most people already have on hand, and there’s no real way to overcomplicate it.
Recipe 5: Appeltaart (Dutch Apple Pie)
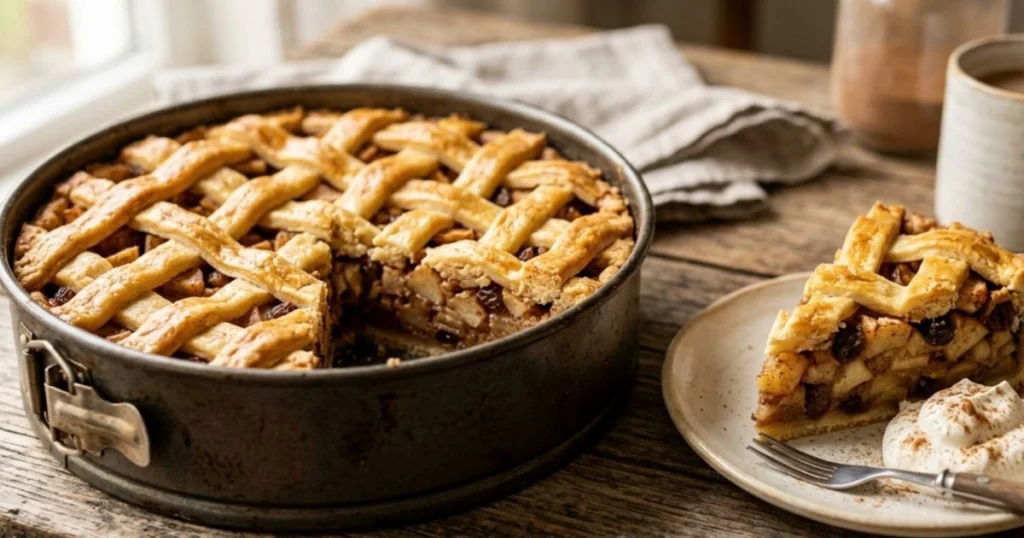
Dutch apple pie is denser and less syrupy than the American version, with a shortbread-like crust and a lattice top instead of a full crust. My first appeltaart came out with a soggy bottom because I didn’t pre-bake the crust enough — now I always blind bake for a few minutes first.
Ingredients
| Ingredient | Amount | Why It’s There / Substitute |
|---|---|---|
| All-purpose flour | 2 1/2 cups | Crust base |
| Cold butter, cubed | 1 cup | Creates the shortbread-like texture |
| Sugar | 3/4 cup | Sweetens crust and filling combined |
| Egg | 1 | Binds the dough |
| Baking powder | 1 tsp | Slight lift in the crust |
| Cinnamon | 2 tsp | Classic Dutch apple pie spice |
| Apples, peeled and sliced | 6-7 medium | Firm, tart apples like Granny Smith hold up best |
| Raisins | 1/2 cup | Traditional addition; can be omitted |
| Lemon juice | 1 tbsp | Prevents apples from browning, adds brightness |
| Breadcrumbs | 2 tbsp | Absorbs excess apple juice, prevents a soggy crust |
Instructions
Make the Dough
- In a large bowl, combine flour, sugar, and baking powder. Cut in cold butter until the mixture resembles coarse crumbs.
- Add the egg and mix just until the dough comes together. Wrap two-thirds of it and chill 20 minutes; keep the remaining third for the lattice top.
Assemble the Pie
- Toss sliced apples with cinnamon, lemon juice, and raisins.
- Press the larger portion of dough into a greased 9-inch springform pan, building up the sides about 2 inches.
- Sprinkle breadcrumbs over the bottom of the crust, then fill with the apple mixture, pressing down gently.
- Roll the reserved dough into strips and arrange in a lattice pattern over the top.
Bake
- Bake at 350°F for 60-70 minutes, until the top is golden brown and the apples feel soft when pierced through the lattice.
- Cool in the pan for at least 30 minutes before releasing the springform sides — cutting too early causes the filling to spill.
If fruit pies are more your speed once apple season winds down, our peach pie filling recipe uses the same lattice-and-lemon-juice logic that keeps this appeltaart from turning soggy.
Using tart, fiber-rich apples isn’t just about flavor balance either — according to Healthline’s nutrition breakdown of apples, they contain notable fiber and antioxidants that may benefit heart health, which is a nice bonus in a dessert this indulgent.
Recipe 6: Bitterballen (Crispy Beef Croquette Bites)

Traditional bitterballen are deep-fried, but I’ve simplified this version to bake in the oven, which is far more realistic for a home kitchen without a deep fryer. They won’t be quite as shatteringly crisp, but the creamy interior is identical.
Ingredients
| Ingredient | Amount | Why It’s There / Substitute |
|---|---|---|
| Butter | 4 tbsp | Base for the roux |
| Flour | 1/2 cup | Thickens the filling into a scoopable paste |
| Beef broth | 2 cups | Liquid base; sub vegetable broth |
| Cooked, shredded beef | 1 1/2 cups | Traditional filling; sub shredded chicken |
| Nutmeg | 1/4 tsp | Classic Dutch savory spice |
| Salt and pepper | To taste | Seasoning |
| Eggs, beaten | 2 | For breading |
| Breadcrumbs | 1 1/2 cups | Crispy coating |
| Cooking spray or oil | As needed | Helps the crumb crisp in the oven |
Instructions
- Melt butter in a saucepan, whisk in flour, and cook 2 minutes until it smells nutty, not raw.
- Slowly whisk in beef broth, stirring constantly until thick and smooth, about 5 minutes.
- Stir in shredded beef, nutmeg, salt, and pepper. Spread the mixture into a shallow dish and chill at least 2 hours, or until firm enough to shape.
- Scoop and roll into small balls, about 1 1/2 tablespoons each.
- Dip each ball in beaten egg, then roll in breadcrumbs, coating fully.
- Arrange on a lined baking sheet, spray lightly with oil, and bake at 400°F for 20-25 minutes, flipping halfway, until deep golden brown.
Where I went wrong the first time: skipping the chilling step. Without at least 2 hours in the fridge, the filling is too loose to roll and just falls apart in the breadcrumbs.
Pro Tips and Common Mistakes
After making these easy Dutch recipes at home more times than I can count, a few lessons kept repeating themselves.
- Don’t rush resting or chilling steps. Poffertjes batter and bitterballen filling both need their resting time to hold together properly.
- Season in layers, not all at once. Dutch cooking relies on gentle seasoning throughout cooking rather than one big salt addition at the end.
- Use starchy potatoes for mash-based dishes. Waxy potatoes stay too firm for hutspot’s texture.
- Don’t overcrowd the pan. Whether frying eggs for uitsmijter or poffertjes in a skillet, crowding drops the pan temperature and leads to uneven cooking.
Variations and Substitutions
These recipes are flexible once you understand the base technique.
- Poffertjes: swap half the flour for buckwheat flour for a more traditional, slightly nutty version.
- Erwtensoep: make it vegetarian by skipping the meat and using vegetable stock plus a splash of liquid smoke for depth.
- Hutspot: add sweet potato for extra sweetness, or stir in crumbled bacon for a smokier version.
- Uitsmijter: swap ham for roast beef, or add sliced tomato for freshness.
- Appeltaart: use pears instead of apples for a softer, more delicate filling.
- Bitterballen: swap beef for mushrooms and vegetable broth for a fully vegetarian version.
If you enjoy building out your dessert repertoire beyond appeltaart, our classic Nestle chocolate chip cookie recipe is another well-tested option worth keeping in rotation.
Storage, Reheating and Make-Ahead Instructions
Each of these dishes holds up differently in the fridge, so I’ve tested storage times for all six.
- Poffertjes: store in an airtight container up to 2 days; reheat in a dry skillet over low heat for 1-2 minutes per side.
- Erwtensoep: keeps 4 days refrigerated, or freeze up to 3 months. It thickens significantly once chilled — thin with a splash of broth when reheating.
- Hutspot: refrigerate up to 3 days; reheat gently on the stovetop with a splash of milk to loosen it back up.
- Uitsmijter: best eaten fresh; the fried egg doesn’t hold up well for leftovers.
- Appeltaart: covered and refrigerated, it keeps 4-5 days and honestly tastes better on day two once the flavors settle.
- Bitterballen: freeze the uncooked, breaded balls on a tray, then transfer to a bag once solid; bake straight from frozen, adding 5-8 extra minutes.
If you get into the habit of batch-cooking fruit fillings for pies, our canning peach pie filling at home guide walks through a similar make-ahead approach you can apply to other fruit desserts.
Serving Suggestions
Erwtensoep is traditionally served with dark rye bread and a slice of smoked sausage on the side. Hutspot pairs perfectly with braised beef (klapstuk) or grilled sausage, spooned right alongside the mash. Uitsmijter needs nothing more than a simple side salad to round out lunch. Appeltaart is best with a dollop of freshly whipped cream no ice cream needed, since the crust already carries plenty of sweetness.
For a full spread, bitterballen make an excellent starter before any of the heartier mains on this list, served hot with a small dish of mustard for dipping. If you’re looking for more quick weeknight mains to round out the week, our easy ground chicken dinner ideas follow the same one-pan, budget-friendly spirit as hutspot and erwtensoep.
Frequently Asked Questions
Can I make these easy Dutch recipes at home without a stand mixer? Yes. None of these six recipes require a stand mixer — a whisk, a fork for cutting butter, and a wooden spoon are all you need.
How long does erwtensoep last in the fridge? Properly stored in an airtight container, it lasts about 4 days refrigerated and up to 3 months in the freezer.
What’s the difference between hutspot and stamppot? Hutspot specifically refers to the potato, carrot, and onion mash, while stamppot is the broader category of Dutch mashed dishes that can include kale, endive, or sauerkraut mixed into potatoes.
Can I bake bitterballen instead of deep-frying them? Yes, and this article’s version does exactly that. They won’t be quite as crisp as deep-fried, but a light spray of oil before baking gets you close.
Is appeltaart the same as American apple pie? Not quite. Dutch appeltaart uses a thicker, shortbread-style crust, a lattice top instead of a full top crust, and is baked in a springform pan rather than a standard pie dish.
Do I need special Dutch ingredients to make these recipes? No. Rookworst and Gouda are the only slightly specialty items, and both are widely available at most major grocery stores or easily substituted.
Final Thoughts
Two years after that disastrous first batch of poffertjes, I made them for my mother-in-law again, and she didn’t laugh once — she just asked for the recipe. That’s really the promise of easy Dutch recipes at home: humble ingredients, forgiving techniques, and results that taste like they took far more effort than they did. Start with whichever recipe matches how much time you have tonight, and the rest will follow naturally.
Written by IJRecipes, home cook and food writer.