
The Ultimate Guide to Canning Peach Pie Filling at Home
Table of Contents
There’s a specific kind of comfort that comes from a pantry shelf lined with golden jars. Not the kind you buy at a grocery store — the kind you made. The kind that smells like a July afternoon when you crack the lid open in the middle of January. My grandmother’s hands smelled like peaches every August, and I didn’t understand why until I started canning myself. Now I do. Preservation isn’t a chore — it’s a way of holding onto something before it’s gone.

If you’ve been thinking about canning peach pie filling at home but don’t know where to start — or you’ve tried before and ran into problems — this guide is built for you. By the time you finish reading, you’ll have everything you need to fill your shelves with jars of summer that last well into the cold months ahead.
Why Canning Peach Pie Filling at Home Is Worth It
Let’s be clear: store-bought pie filling exists for a reason. It’s convenient. But once you taste homemade, there’s really no going back.
When you make your own canning peach pie filling, you control everything — the sweetness, the spice level, the thickness, and the quality of fruit going in. No high-fructose corn syrup, no artificial dyes, no mystery thickeners. Just real peaches, a tested recipe, and your own two hands.
Beyond flavor, the economics make sense too. Buying peaches in season — especially from a local farm or u-pick orchard — can cost a fraction of what you’d spend on canned goods over the course of a year. One bushel of peaches, roughly 50 pounds, can yield 16 to 20 quarts of finished pie filling. That’s a lot of winter pies for a very reasonable investment.
And the uses go far beyond pie. Your canned peach filling works beautifully over vanilla ice cream, stirred into morning oatmeal, layered into a cobbler, or spooned warm over crepes on a slow Sunday morning.
What You Need Before You Start
Equipment
Before you touch a single peach, make sure your setup is ready. You’ll need:
- A water bath canner or a large stockpot with a rack on the bottom
- Mason jars — quart-sized for a full pie, pint-sized for smaller uses
- A jar lifter, canning funnel, and lid wand
- A large saucepan for cooking the filling
- A bubble remover tool or a thin spatula
Getting your equipment together before you start saves you from scrambling mid-process — and in canning, timing matters.
Choosing Your Peaches
Not all peaches are equal when it comes to canning. You want freestone peaches, where the pit separates cleanly from the flesh. Varieties like Redhaven, Loring, and Reliance work particularly well. Avoid overripe or bruised fruit — it breaks down during processing and turns your filling mushy rather than holding its shape.
Your peaches should smell fragrant at the stem, yield slightly when pressed, and show a deep golden-yellow base. Whenever possible, purchase from a farmers market or a u-pick farm, and schedule your canning within one or two days of buying.
The Ingredients You’ll Need
The recipe below is scaled for 7 quart jars and follows USDA-tested guidelines — meaning it’s been verified safe for water bath canning.
| Ingredient | Amount | Notes |
|---|---|---|
| Fresh peaches, sliced | 17.5 lbs | Peeled and pitted |
| Clear Jel® (cook type) | 5¼ cups | Only USDA-approved thickener |
| Granulated sugar | 7 cups | Adjust slightly to taste |
| Cold water | 5 cups | For the slurry |
| Peach juice or water | 3¾ cups | From blanching liquid |
| Bottled lemon juice | ½ cup | Standardized acidity — don’t substitute |
| Ground cinnamon | 1¾ tsp | Optional |
| Ground nutmeg | ½ tsp | Optional |
| Almond extract | ½ tsp | Optional |
One point worth repeating: always use Clear Jel®, not cornstarch, not flour, not arrowroot. Clear Jel is the only thickener that remains stable during the heat of canning and doesn’t interfere with heat penetration inside the jar. Using anything else creates a food safety risk that isn’t worth taking.
Step-by-Step: How to Can Peach Pie Filling

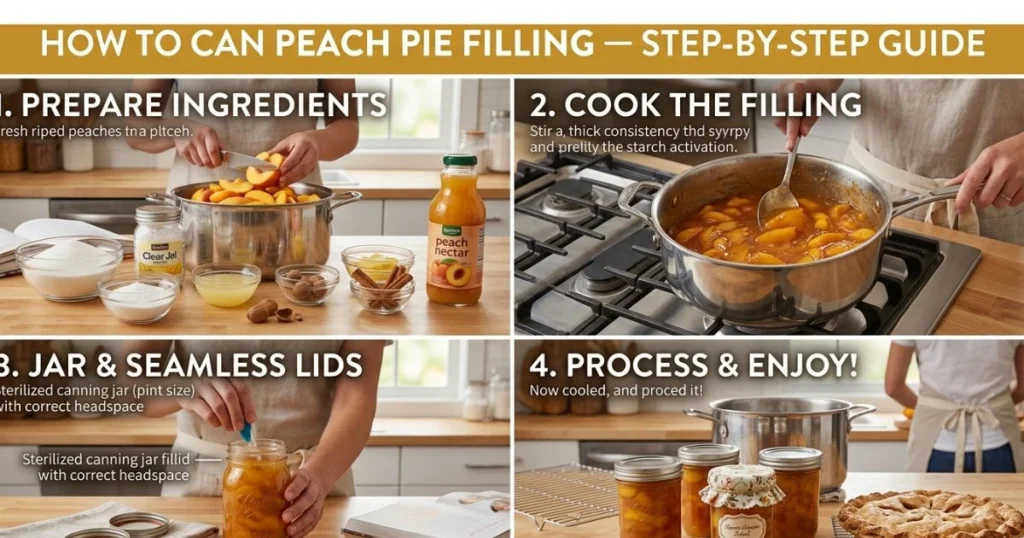
Step 1 — Prep Your Peaches
Start by washing your peaches well. Then blanch them in batches — drop them into boiling water for about 30 to 60 seconds, then transfer immediately to a bowl of ice water. The skins slip right off after that.
Once peeled, pit your peaches and cut them into half-inch to three-quarter-inch slices. Drop sliced peaches into a solution of 1 teaspoon ascorbic acid per gallon of water. This keeps them from browning while you work through the batch.
Step 2 — Cook the Filling
In a large, heavy-bottomed saucepan, whisk together your Clear Jel and sugar. Gradually add cold water and peach juice, whisking until smooth. Set the pan over medium-high heat and stir continuously. The mixture will thicken and start to bubble — keep stirring so it doesn’t scorch.
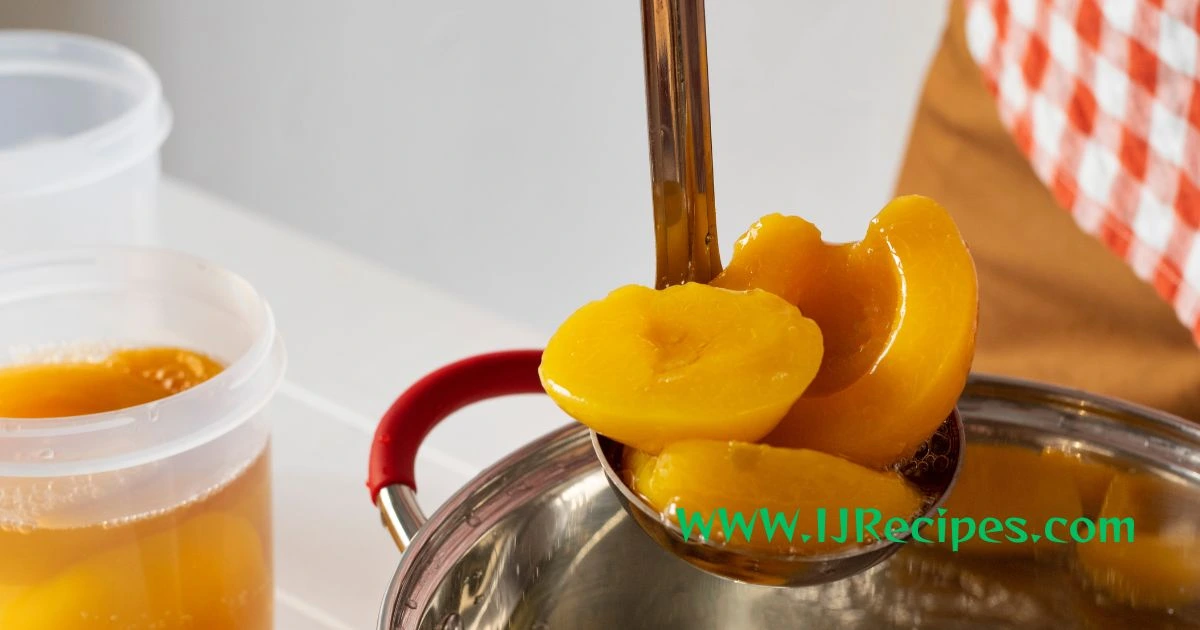
When the mixture is bubbling and has thickened, stir in the bottled lemon juice along with any spices you’re adding. Stir for one more minute. Then fold in your drained peach slices gently — you want them coated, not broken.
Step 3 — Fill Your Jars
Ladle the hot filling into hot, sterilized jars. Leave exactly one inch of headspace — this is not optional. Too little headspace and your jars won’t seal properly. Too much and you risk oxidation.
Run a thin spatula or bubble remover around the inside edges of each jar to release any trapped air. Wipe the jar rims with a clean, damp cloth — even a tiny bit of filling on the rim can prevent a good seal. Apply lids and bands to fingertip tightness only. Overtightening actually prevents proper sealing.
Step 4 — Process in a Water Bath Canner
Lower your filled jars into the canner, making sure they’re fully submerged under at least one inch of water. Bring to a full, rolling boil, then start your timer.
| Altitude | Quarts | Pints |
|---|---|---|
| 0–1,000 ft | 30 min | 25 min |
| 1,001–3,000 ft | 35 min | 30 min |
| 3,001–6,000 ft | 40 min | 35 min |
| Above 6,000 ft | 45 min | 40 min |
When processing is complete, turn off the heat and let the jars sit in the water for five minutes before removing them.
Step 5 — Cool and Confirm Your Seals
Place jars on a towel-lined surface and leave them undisturbed for 12 to 24 hours. Don’t tilt them, press the lids, or move them around — let the sealing process finish on its own.
After 24 hours, press the center of each lid. A properly sealed lid will be firm and won’t flex. If any lid pops up and down, that jar didn’t seal — refrigerate it and use within one week.
How to Store Your Canned Peach Pie Filling
Store your sealed jars in a cool, dark spot between 50°F and 70°F. A kitchen cabinet away from the stove, a basement shelf, or a pantry all work well — just avoid areas with temperature swings, like an uninsulated garage.
Label each jar with the date and contents. Properly canned peach pie filling stays safe for up to 18 months, though the flavor and texture are best within the first 12.
Troubleshooting Common Problems
Even experienced canners hit snags. Here’s what to watch for:
| Problem | Likely Cause | Solution |
|---|---|---|
| Filling too thin | Wrong thickener or mismeasured Clear Jel | Use precise measurements next batch |
| Peaches browned | Didn’t treat slices with ascorbic acid | Treat immediately after cutting |
| Jars didn’t seal | Residue on rim or wrong headspace | Reprocess within 24 hours or refrigerate |
| Filling overflowed | Insufficient headspace | Always leave one inch |
| Lids buckled | Over-tightened bands | Fingertip-tight only |
Frequently Asked Questions About Canning Peach Pie Filling
Can I use cornstarch instead of Clear Jel when canning peach pie filling? No — and this one really matters. Cornstarch breaks down under canning heat and can create cold spots inside the jar that allow dangerous bacteria to survive. Stick with Cook-type Clear Jel every time.
How long does canned peach pie filling last? It can last up to 18 months when kept in a cool, dark place, though it’s best used within the first 12 months for optimal quality.
Do I have to use bottled lemon juice in my canning peach pie filling recipe? Yes. Bottled lemon juice has a consistent acidity of 5%, which fresh lemons don’t guarantee. That consistent pH is what makes your filling safe to water bath can.
Can I reduce the sugar in my canning peach pie filling? You can reduce it somewhat, but don’t eliminate it entirely. Sugar affects both texture and preservation. Use a tested low-sugar recipe rather than modifying on your own.
My canning peach pie filling didn’t thicken — what happened? The most common causes are using the wrong thickener, mismeasuring Clear Jel, or not cooking the mixture long enough before adding peaches. The filling also continues to firm up as it cools inside the sealed jar.
Your Summer Deserves a Shelf Full of These Jars
Here’s the thing about canning peach pie filling at home — the first time you open a jar in February and the smell of summer fills your kitchen, you’ll wonder why you waited so long to start. It’s one of those skills that rewards you every single time.
You don’t need to be an expert. You don’t need a fancy kitchen. You need ripe peaches, the right thickener, a tested recipe, and a little patience.
Ready to get started? Grab a bushel of peaches at your next farmers market visit, order Clear Jel online, and set aside a Saturday morning. Your future self — the one standing in a cold kitchen reaching for that jar of golden filling — is going to thank you.
And if this guide helped you, share it with a friend who’s been curious about canning. The more people preserve real food, the better our tables — and our winters — become.