

The Best Homemade Apple Pie Filling Recipe for Perfect Pies
Table of Contents
There’s something truly special about walking into a kitchen filled with the aroma of cinnamon-spiced apples bubbling away in the oven. Maybe you’re chasing that memory of your grandmother’s legendary dessert, or perhaps you’re determined to finally create a pie worthy of your family table. Whatever brought you here, you’ve likely discovered that the distance between an ordinary pie and an extraordinary one hinges entirely on what goes inside the crust.

If your previous attempts at making apple pie have left you disappointed—with filling that leaks across the oven floor or turns into an unappetizing mush—you’re definitely not alone. The secret to nailing this dessert isn’t some mysterious baker’s magic; it’s understanding the fundamentals of what makes a stellar filling work.
Why Your Homemade Apple Pie Filling Recipe Matters
You might wonder why you should invest the effort into making your own apple pie filling recipe from scratch when perfectly acceptable canned versions sit on supermarket shelves. The answer becomes crystal clear the moment you bite into a slice made with homemade filling.
When you create your own apple pie filling recipe, you’re in complete control. You decide the exact sweetness level, choose which spices go into your mixture, and hand-select every single apple. Store-bought versions contain preservatives you probably can’t even pronounce, along with thickeners that create a gluey texture rather than a properly structured filling. Your homemade apple pie filling recipe will cost you significantly less per pie while delivering restaurant-quality results that’ll have everyone asking for your secret.
Beyond the obvious taste advantages, making your own apple pie filling recipe gives you the flexibility to customize it based on your family’s preferences. Some of you might prefer your filling slightly tart, while others in your household may want something sweeter. That control simply doesn’t exist when you’re dependent on what manufacturers decide to put in their cans.
Selecting the Perfect Apples for Your Creation
The foundation of any exceptional apple pie filling recipe starts with choosing the right apples. You’ll want to think about this decision carefully because the variety dramatically influences your final result.
Your best bet involves combining multiple apple types rather than relying on a single variety. Consider using roughly 60% Granny Smith apples paired with 40% Honeycrisp. The Granny Smiths contribute tartness and structure, keeping their shape during baking, while the Honeycrisp varieties add natural sweetness and complexity. This combination creates layers of flavor that a single-apple pie simply cannot achieve.
Other solid choices for your apple pie filling recipe include Braeburn, Pink Lady, or Northern Spy varieties. What matters most is selecting firm apples without soft spots or bruises. When you’re at the grocery store, give each apple a gentle squeeze—you want ones with some resistance, not mushy fruit that’ll deteriorate further during baking.
Here’s a practical tip: medium-sized apples slice more evenly than enormous ones, which means your filling will cook more uniformly. Aim for fruit that’s roughly 3 inches in diameter.
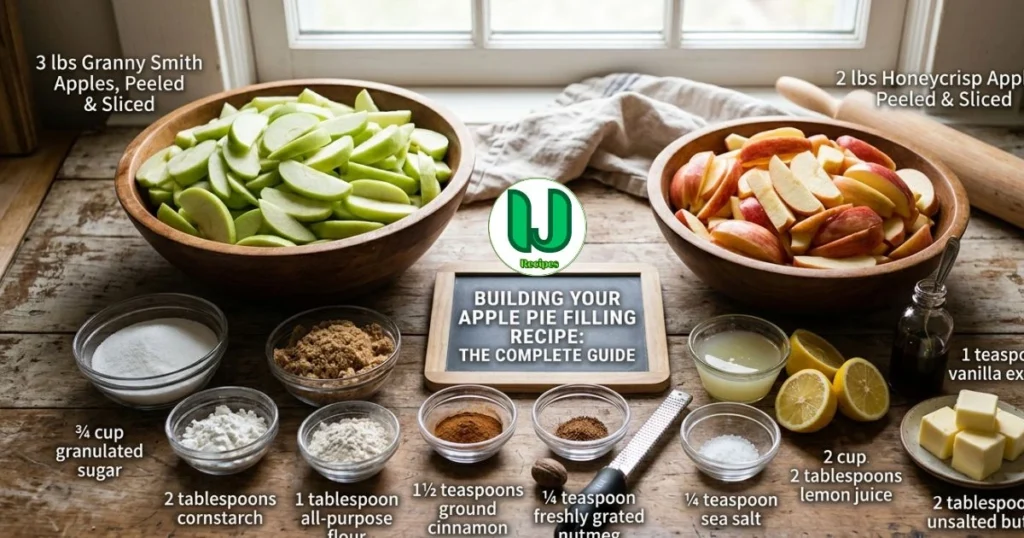
Building Your Apple Pie Filling Recipe: The Complete Guide
What You’ll Need
Your apple pie filling recipe requires these essential components:
- 3 pounds Granny Smith apples, peeled and sliced
- 2 pounds Honeycrisp apples, peeled and sliced
- ¾ cup granulated sugar
- ¼ cup brown sugar
- 2 tablespoons cornstarch
- 1 tablespoon all-purpose flour
- 1½ teaspoons ground cinnamon
- ¼ teaspoon freshly grated nutmeg
- ¼ teaspoon sea salt
- 2 tablespoons fresh lemon juice
- 1 teaspoon vanilla extract
- 2 tablespoons unsalted butter
The Preparation Process
Start by washing your apples thoroughly under running water. Grab your vegetable peeler and work methodically from top to bottom, creating thin, even strips. You’ll need a sturdy peeler here—don’t skimp on quality equipment.
Next, cut each apple in half and use an apple corer to remove the central core completely. This step prevents any hidden seeds from ending up in your finished apple pie filling recipe. Now slice each apple half into uniform quarter-inch pieces. Consistency matters here because thicker pieces won’t cook through while thinner ones turn mushy.
The moment your apples hit the cutting board, they begin oxidizing and browning. Immediately place them in a large bowl and drizzle with fresh lemon juice. Toss gently to coat everything. This prevents that unappealing brown discoloration and adds brightness to your apple pie filling recipe’s flavor profile.
Creating the Flavor Foundation
In a separate small bowl, whisk together your granulated sugar, brown sugar, cinnamon, nutmeg, and salt. Pour this mixture over your lemon-coated apples and gently fold everything together using a rubber spatula. Avoid aggressive stirring—you want to keep those apple slices intact rather than crushing them into pulp.
Now add your vanilla extract and fold once more. Let everything rest for five minutes. You’ll notice the apples beginning to release their natural juices. This is exactly what you want happening.
The Thickening Agent
This is where many homemade apple pie filling recipe attempts fail. Whisking 2 tablespoons of cornstarch with 1 tablespoon of flour together in a small bowl, then gently sprinkling this mixture over your apples and folding it in creates the structure that prevents your filling from turning into soup.
Cut your butter into small pieces and distribute them throughout the mixture. The butter will melt during baking and contribute richness that takes your apple pie filling recipe from good to exceptional.
At this point, your filling is ready to use immediately, or you can refrigerate it for up to four days before assembling your pie.
Understanding Why Your Apple Pie Filling Recipe Works
The science behind a successful filling might surprise you. Cornstarch absorbs liquid and thickens at relatively low temperatures, making it perfect for pie filling. As your apples bake, they release moisture, and the cornstarch captures that liquid, transforming it into a glossy sauce rather than a puddle.
The combination of granulated and brown sugar serves multiple purposes. Granulated sugar dissolves quickly and sweetens your apple pie filling recipe, while brown sugar adds moisture and contributes deep caramel notes that enhance overall complexity. Together, they create the ideal sweetness balance without overwhelming the apples’ natural flavor.
The small amount of salt might seem insignificant, but it’s actually crucial. Salt heightens sweetness perception and prevents your apple pie filling recipe from tasting flat or one-dimensional.
Making Your Apple Pie Filling Recipe Ahead
You’re busy, and sometimes you need to prepare components in advance. Good news: your apple pie filling recipe actually improves when made a day or two ahead. The flavors meld together, deepening and developing in ways that fresher filling hasn’t quite achieved yet.
Store your prepared filling in an airtight glass container in your refrigerator for up to four days. For longer storage, transfer it to freezer-safe containers and freeze for up to four months. When you’re ready to bake, simply remove it from the freezer the night before and let it thaw in your refrigerator.
You can also assemble your entire pie with filling and freeze it unbaked. When you’re ready to serve, pop it directly into a preheated 375°F oven and bake for fifty to sixty minutes instead of the standard forty-five to fifty-five minutes for room-temperature filling.
Solving Common Problems With Your Apple Pie Filling Recipe
When Your Filling Turns Out Too Runny
This ranks as the most frequent complaint about homemade apple pie filling recipe attempts. The culprit is usually insufficient thickening agent. If your filling has too much liquid, make a slurry by mixing 1 tablespoon of cornstarch with 1 tablespoon of cold water. Stir this into your apple pie filling recipe and let it sit for five minutes. The extra cornstarch will absorb that excess moisture.
Prevention is easier than fixing problems, so measure your thickening agents carefully. You need exactly 2 tablespoons of cornstarch per 5 pounds of apples—no more, no less.
Apples That Become Mushy
If your apples transform into applesauce rather than maintaining their shape, you’re handling your apple pie filling recipe too roughly during mixing. Use a gentle folding motion with a rubber spatula instead of stirring vigorously.
Additionally, some apple varieties naturally break down faster than others. Stick with firmer types like Granny Smith and avoid softer varieties like Macintosh entirely.
Filling That Never Thickens Properly
Make sure your oven temperature is accurate. Ovens frequently run hotter or cooler than their settings indicate. Invest in an inexpensive oven thermometer to verify. Also, allow your pie adequate cooling time. Your apple pie filling recipe continues thickening for three to four hours after baking. Cutting into it too early results in runny filling that hasn’t had time to set properly.
Variations Worth Trying
Once you’ve mastered the basic apple pie filling recipe, explore these creative twists. A chai-inspired version adds cardamom and ground ginger for exotic warmth. A caramel apple pie filling recipe incorporates dulce de leche for decadent richness. A cranberry variation introduces tartness and beautiful color complexity.
You might even try a salted caramel apple pie filling recipe that balances sweet and savory elements, creating sophisticated flavor layers that surprise and delight your guests.
Assembling Your Pie With Confidence
When you’re ready to build your pie, pour your apple pie filling recipe into an unbaked crust. Mound it slightly in the center—this prevents filling from spreading too thin across the bottom. Top with your second crust, seal the edges, and cut vents to release steam.
Brush with egg wash for that gorgeous golden finish. Bake at 375°F until your crust turns deep brown and you can see filling bubbling actively at the vents—usually forty-five to fifty-five minutes.
Here’s the hardest part: resisting the urge to slice into your pie immediately. Wait at least three to four hours while your apple pie filling recipe sets completely. This patience pays off with clean slices and perfectly textured filling rather than a runny mess.
Your Journey to Pie Perfection Starts Here
Creating an exceptional homemade apple pie filling recipe is genuinely achievable for anyone willing to follow these guidelines carefully. You don’t need special equipment or advanced baking experience. What you do need is quality apples, attention to detail, and patience during the cooling process.
Your first attempt might not be flawless—and that’s perfectly acceptable. Each pie teaches you something new about your preferences, your oven‘s quirks, and what works within your kitchen environment.
Ready to transform your pie game? Gather your ingredients this week and make your first batch of homemade apple pie filling recipe. Share your results in the comments below—we’d love hearing about your experience. And if you encounter any challenges, tell us specifically what went wrong so we can help troubleshoot together. Your perfect pie awaits, and it all begins with that first slice of apple heaven.